A 1 Gb/s Ethernet connection can’t keep up with modern disks or the processors in Synology NAS boxes. For those of you with really deep pockets, there are Synology boxes with 10 Gb/s interfaces and 10 gigabit Ethernet switches to match, but for the rest of us, there’s link aggregation. Link aggregation, aka (in the Microsoft world) as Ethernet teaming, allows a computer (and, in this context, a NAS box counts as a computer) to bond together two or more Ethernet links so that they act as one higher-speed one. It also provides the ability to survive the loss of one link with no penalty other than decreased performance. The most common way of doing link aggregation is defined by an IEEE standard, 802.3ad. That’s the kind I’ll be discussing here.
To set up link aggregation, you need to make changes to your Ethernet switch to tell it to treat two ports as one aggregated connection, and to your computer, to do the same. Make just one change, and it won’t work. And, with the Synology boxes and the Cisco SG 300 switches, do things in the wrong order and it won’t work. That situation may obtain with other switches as well.
Through trial and lots of error, I’ve figured out how to make it all work.
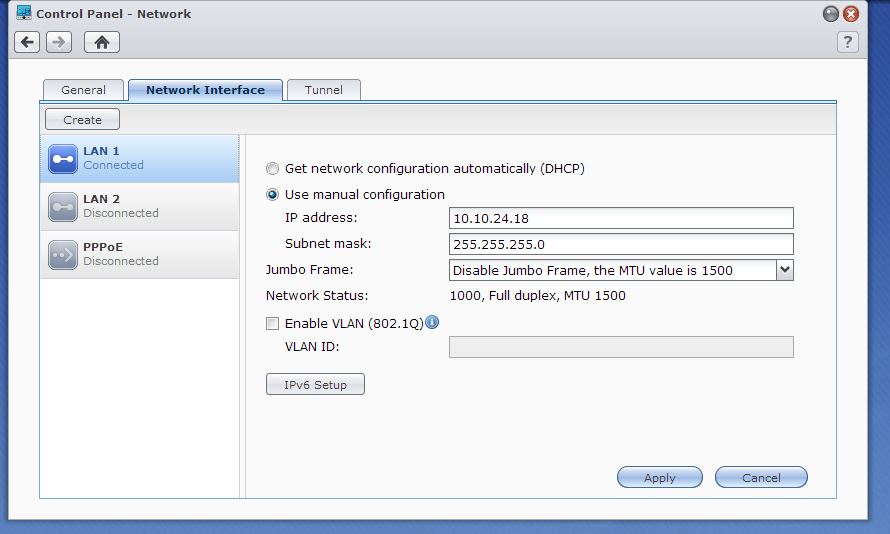
First, connect the Synology box — hereafter called the NAS — to the switch with one Ethernet cable. Set up the network configuration for a fixed IP address. I suppose it might work with a DHCP-assigned IP address, but I think it’s safer to make it fixed.
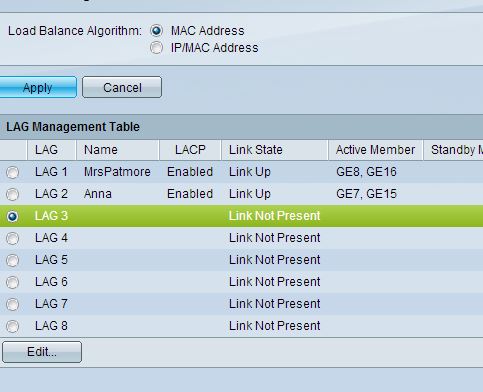
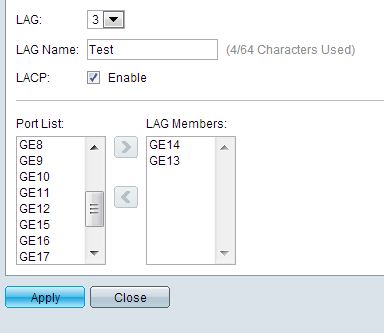
Find two free ports on the Cisco switch. Set up link aggregation from Administration > Port Management > Link Aggregation > LAG management. A LAG is, I suppose, a Link Aggregation Group.
Click the selection box to the left of one of the LAG group entries, and then click on the Edit button at the screen.
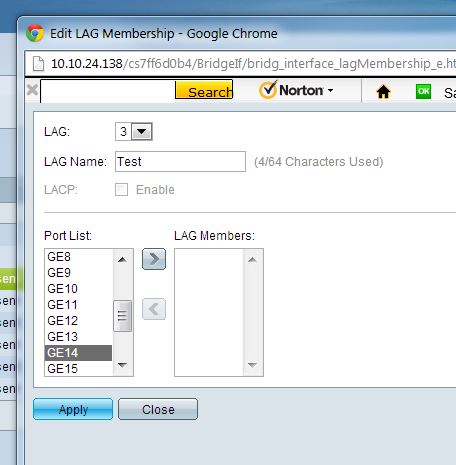
Now you’ll see the window where you can create a LAG. Pick one of the two free ports.
Hit the arrow to move the port to the LAG.
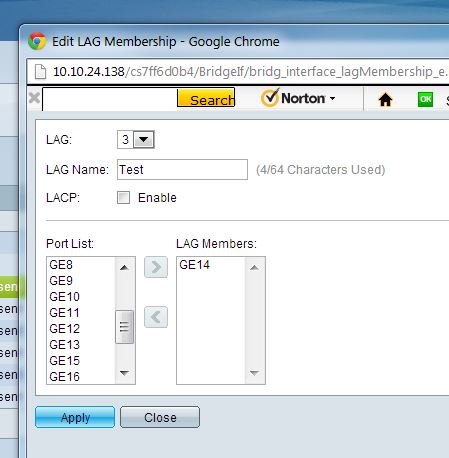
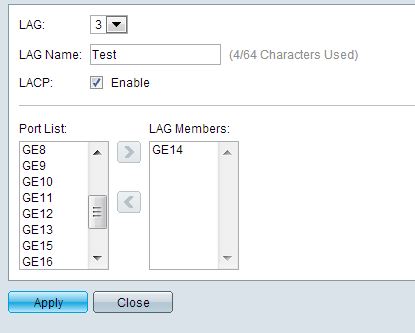
And click the Enable check box next to LACP. Don’t miss this step!
Now add the next port.
Hit Apply, and close the window. Now log on to your NAS, open the control panel, click on network, and click on the Network Interface tab.
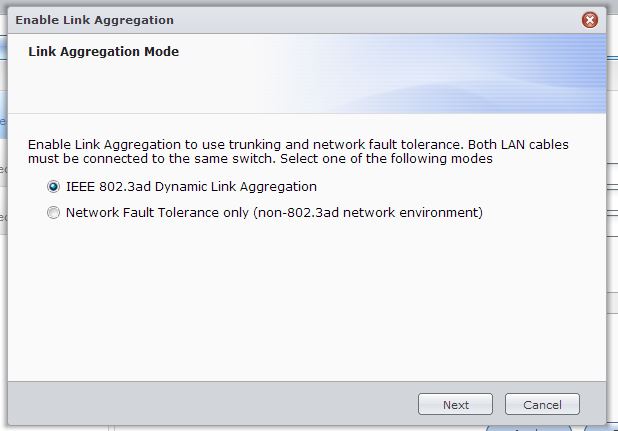
Click on the Create button to create the aggregated link. Accept the default IEEE 802.3ad option, and click next.
Make sue both LAN interfaces are checked.
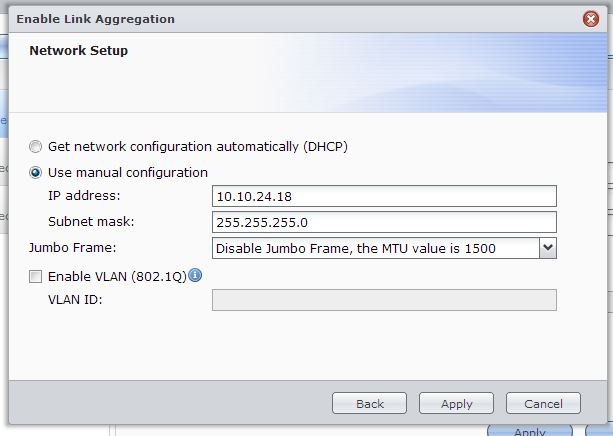
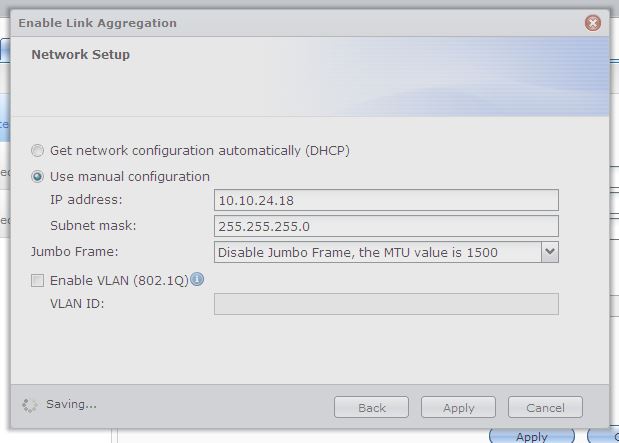
The next screen will reflect the network configuration you’ve already entered. Hit Apply.
The window will go gray for a minute or two, which will seem like a long time. Have patience.
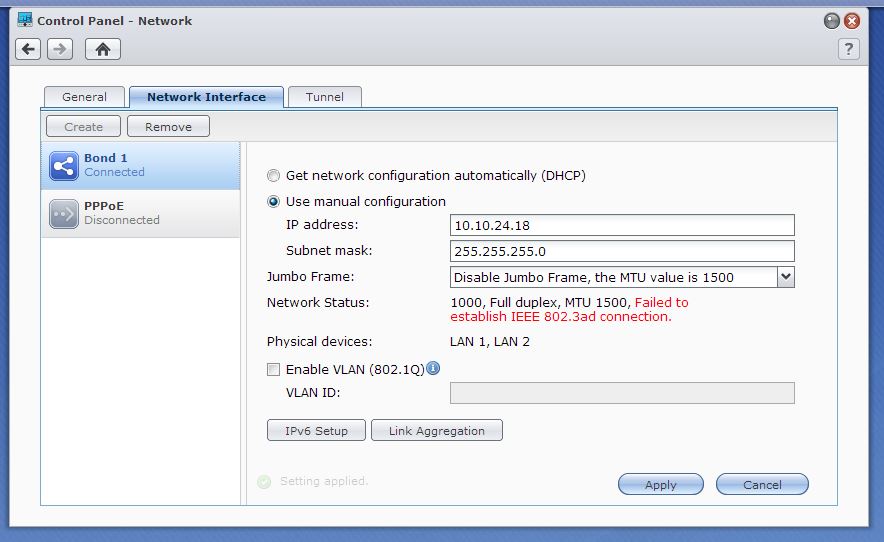
Then the NAS will complain, because you haven’t connected to the LAG on the switch yet.
Disconnect the NAS LAN port you’ve been using so far from the switch and connect it to one of the ports in the LAG. Connect the other NAS LAN port to the other port in the LAG. After a short while, the NAS will be happy.
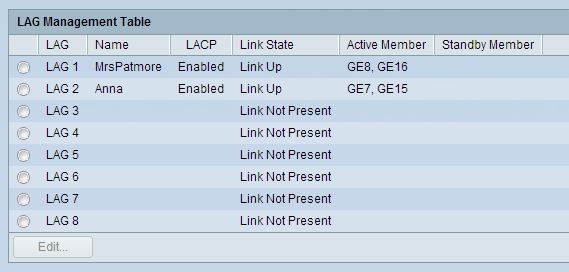
Now go to the Cisco LAG screen and make sure it’s happy too.
You’re done. Enjoy your high speed connection.


Ripper, thanks so much for publishing this!
I had the same model router and looks to me like a software bug with editing the LAG group – if you don’t do it in the order you described, you can’t tick the “Enable” tick box so it will never be enabled.
You cannot change the LAG parameters (enable LACP) if there are members in the LAG already. I believe the manual says something to that effect. I set this up today, forgot to click “Enable LACP”, went back in, removed the ports from the LAG, enabled LACP, then added the ports back again and it was fine.
Thanks, Jason. Exactly my thoughts. If we’re right, this same problem will affect all Cisco switch users with similar firmware, not just those with Synology NAS boxes.
Jim
Hi. But the question is then….. did you get any higher performance out of this setup?
because i have my DS412+ setup with LACP between my HP ProCurve 1810g and my ASUS P8P67 motherboard with dual NIC’s and i still don’t get any higher daterates eventough my computer says i have a 2Gbit/s connection.
/Dennis
Your workstation will report you’re connected at 2.0 Gbps regardless of the actual speed that is detected between your switch and your system. That’s just Windows being Windows.
A better questions are, how many disks and and at what speed (SSD, 4200, 5400, 7200, 10000 RPM) are you using in the 412+? And which RAID level are they configured in DSM? There are many more factors at play than just simple port speed.
Dennis,
You are right. That’s the question. And, so far, my experience is similar to yours. I’ve been transferring data between two Synology boxes, each with LA, and I’m seeing somewhat higher average rates. I am seeing peak rates that are the full 2Gb/s, but they don’t last long. I was thinking that I needed to do some more research before posting my findings, but since you mention it…
Jim
For anyone that’s interested in configuring LAG/LACP with a SG 200-08 (Firmware 1.0.6.2/Boot Ver 1.0.0.12) and Synology DS412+ (DSM 4.3-3776) – here are the steps I performed:
1) Configured a Dynamic LAG on the SG 200. All ports are LACP-enabled by default to facilitate the automation of the formation of dynamic LAGs
2) Connected the Synology to the LAG ports configured in Step 1
At this point, connectivity to the Synology is still working due to the Dynamic LAG Type. It’s treating the ports on the Synology as their own respective interfaces because the Synology is not sending any LACPDUs at this point.
3) In DSM, LAN 1 was already configured with a Static IP (192.168.2.10). LAN 2 connected (DHCP) and enabled prior to bonding the interfaces.
4) Then I bonded the interfaces using the wizard and didn’t experience any failures or freak outs in DSM. I had a constant “ping -t 192.168.2.10” running from my workstation in order to test connectivity and downtime while it bonded LAN 1 and 2. This was possible since I used the same Static IP for my bonded interface as I used for LAN 1. The downtime while it bonded the interfaces was somewhere between five to ten seconds. I only received 3 “request timed out” messages from the ping session.
If you’re interested in more details or setup, reply.
Worked exactly as shown using Cisco SG-200-26. Well done & thanks for putting this together.
Thanks much. I saw numerous variations on this process around and this one worked like a charm. One small thing to keep an eye out for. In the latest firmware revision (1.0.7.4), the interface is slightly different when setting up a LAG. Instead of a checkbox to enable LACP, there are now a set of Radio Buttons to choose either static or dynamic LAG type. Choosing dynamic enables LACP.
I’m doing exactly this with a DS 1513+ and a Cisco SG200-26 router. I’m aggregating all 4 ports on the disk station. I came across your side while trouble shooting. As it turns out, I set mine up exactly the same way you did (with the exception of 2 more ports). I find as soon as I activate this on my disk station, it slows WAY down. File transfers stall, my IP cameras connect and disconnect constantly, my Time Machine back ups fail… When I turn off link aggregation on the disk station, it goes right back to normal speeds.
Disk Station is running 5.0-4493 and the Cisco is on 1.4.0.88
i have the synology 1813+ and Cisco SG300-10mp, i tried LACP config with 4 LAN port, but don’t see any transfer speed improvement on it, have up benchmark your read and write speed on it?
Brilliant! I’ve been looking at this for a while and couldn’t get it. Now I’m finally using both ports on my DS415+ to full advantage. Thanks!
Nelson, lacp will give you 4 x 1gigabit not 4 gigabit. Multiple machine transfering from or to the synology will have its own 1gbit channel
You’re absolutely right Max.
The fundamentals of LACP is to provide resilience/load balance by bonding multiple physical ports to one logical port which then is given a single IP address.
If one of your NIC’s goes done, there is no dropped connection as the other ports in the LAG will still be up.
As for the load balancing side of it, if the source, destination and TCP/UDP are same when sending a file, the algorithm will decide which physical link to use and continue to use that link from the source to the switch to the destination.